
Do it yourself ideas from baking bread in a flower pot, dyeing your hair naturally and fixing a broken window pane.
Sure you can.
Just a short time ago, if you had a problem that needed fixing, you would enlist the aid of someone you thought to be more qualified than you.
Broken window pane? Call a handyman.
Root ends showing the gray? Head to the beauty salon.
Unclog a drain? Call a plumber.
However, now that we are spending more time at home and more cautious about how many people cross the transom, do it yourself projects are becoming more appealing.
You may underestimate what you can do yourself. Here to help with how-to skills you never thought you could master is the new book from the how-to experts at Storey Publishing.
Storey’s Curious Compendium of Practical and Obscure Skills…214 Things You Can Actually Do Yourself is chockful of ideas and solutions for even the most DIY challenged.
How about learning how to build a firepit, smoke meat on the stove, make toothpaste and hair conditioner, make farmhouse cheddar, give a foot massage, find your way around the night sky, or, more practical, how to rewire a lamp?
Step-by-step directions for these and many more are found in the 344-page, fully illustrated hardcover book.
Whether you plan to “do it yourself” or just love reading about how things are done, this rich compendium will educate, fascinate, spark conversation, and inspire new hobbies and experiences.
Here are three projects excerpted from the book. Have fun!
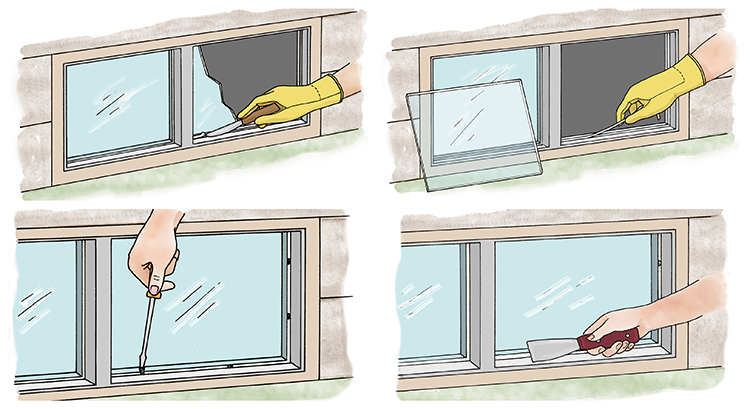
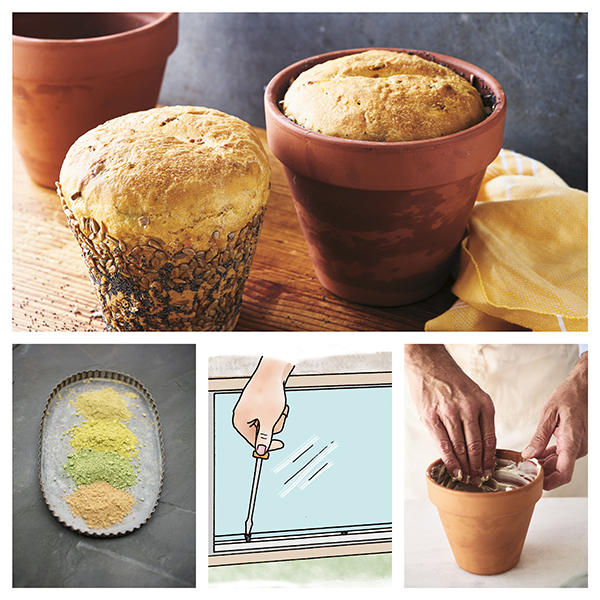
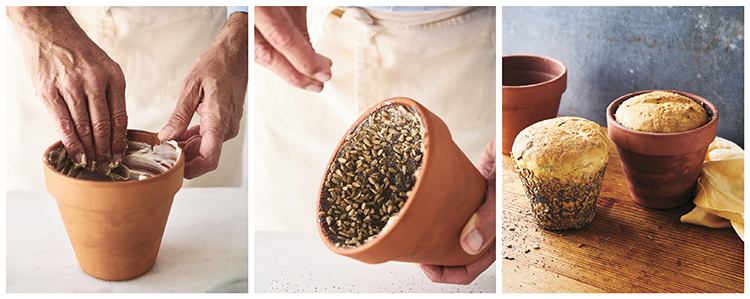
(Top left to right) Steps 1 and 2. (Bottom left to right) Steps 3 and 5. Illustrations by Alison Kolesar.
Do It Yourself: Fix a Broken Windowpane
There are many different types of windows. Some are wood and some are aluminum. There are double-hung windows, casement windows, horizontal sliding windows, awning, and jalousie windows . . . but no matter what kind of window you have, one of the most common problems is a broken pane.
Replacing a broken pane of glass is not a difficult task and it can save you lots of money. The project varies slightly with each type of window. First, the broken glass must be carefully removed. In a wooden window, it is often held in place by a layer of putty (a claylike substance) and glazier’s points (small metal triangles with sharp points).
- Scrape away the old putty with a kitchen knife or putty knife.
- Next, pull away the broken pieces of glass. Make sure to wear protective gloves so you don’t cut yourself.
- You will probably see three or four glazier’s points inserted into the wood; pull them out with pliers. Some window panes are held in place by small wooden slats that are nailed into place; pry them out.
- Clean around the lip of the wooden frame and then take an exact measurement of the frame. Write down the length and width so you don’t forget the dimensions. At a hardware store or glass company, purchase a new glass pane. Have it cut to fit 1/8 inch smaller than each dimension of your frame. You will also need to buy a small can of putty and some glazier’s points.
- Thinly layer the window frame with putty.
- Gently push the new glass into place. It should fit snugly up against the lip of the frame.
- To hold the glass in place, insert a glazier’s point along each side of the window frame. Hold the glazier’s point right next to the glass and push it into the frame with a straight-slot screwdriver or a putty knife. The point is sharp and should go in easily.
- Now you need to seal the window tight with an additional layer of putty. The best way to do this is to take a handful of putty and shape it into a ball. Rub the putty ball between your hands until the putty takes the shape of a snake. Press the snake along the edges of the glass, which forms the seal. Finally, smooth over the putty with your putty knife, removing any excess putty from the glass.
How to bake bread in a flower pot. Photography by Emulsion Studio.
Do It Yourself: Bake Bread in a Flowerpot
Yes, you can bake bread in a terra-cotta flowerpot! It’s only fitting that loaves baked in flowerpots be a showcase for good stuff from the soil, like carrots, onions, and herbs. The vegetables are finely chopped or grated and then dried in the oven to concentrate their flavors. Buy two new terra-cotta pots (51/2 to 6 inches in diameter and about 5 inches tall) just for this purpose; you’ll “season” the pots, like you would a cast-iron skillet, before their initial use.
Makes 2 small loaves
1–2 teaspoons cooking oil, for oiling the baking sheet and bowl 11/2 cups grated carrots 1 celery stalk, finely chopped 1/2 medium onion, finely chopped 2 cups lukewarm water (105°F–110°F/41°C–43°C) 1 tablespoon sugar 1 packet (1/4 ounce) active dry yeast 1/4 cup fine yellow cornmeal 41/4–41/2 cups unbleached all-purpose flour 2 tablespoons unsalted butter, softened, plus more for greasing the flowerpots 2 teaspoons salt 2 tablespoons chopped fresh sage or 2 teaspoons dried 2 teaspoons fresh thyme or 3/4 teaspoon dried 1 cup grated sharp cheddar cheese 1 tablespoon unsalted butter, melted, for brushing the flowerpots and loaves Safflower or light olive oil, for seasoning the flowerpots Sunflower seeds, for coating the loaves
Preheat the oven to 300°F/150°C.
Oil a large rimmed baking sheet very lightly. Spread the carrots, celery, and onion evenly in a single layer on the sheet. Place in the oven and roast for 45 minutes to 1 hour, until shrunken and shriveled but not brittle dry. Transfer the sheet to a cooling rack and allow the vegetables to cool.
Pour the water into a large bowl. Stir in the sugar and sprinkle on the yeast. Stir once or twice with a fork and set aside for 5 minutes.
Add the cornmeal and 3 cups of the flour to the water. Using a wooden spoon, stir well for 100 strokes. Set aside for 10 minutes.
Add the 2 tablespoons softened butter, salt, sage, and thyme to the dough. Stir well. Stir in the veggies and cheese. Add enough of the remaining flour, about 1/4 cup at a time, to make a firm dough that pulls away from the sides of the bowl. Using your wooden spoon, work the dough vigorously against the sides of the bowl for 1 minute or so.
Flour your work surface and turn the dough out. Using floured hands, knead the dough for about 8 minutes, dusting with flour as necessary to keep the dough from sticking. Oil a large ceramic or glass bowl with a teaspoon or two of cooking oil. Add the dough, rotating it to coat the entire surface with oil. Cover the bowl with plastic wrap and set aside in a warm, draft-free spot for 1 to 11/2 hours, until the dough has doubled in bulk.
While the dough rises, season your flowerpots: Preheat the oven to 450°F/230°C. Wash and dry the pots well. Rub the insides thoroughly with safflower or light olive oil. Place the pots on a baking sheet and place in the oven. Bake for 1 hour. Don’t be surprised if a strong odor develops as the pots heat. Remove the pots and cool thoroughly.
Butter the pots well with softened butter and line with strips of parchment paper brushed with melted butter. Cover the bottom hole with a little circle of buttered aluminum foil and sprinkle the inside of the pots with sunflower seeds.
When the dough has doubled, punch it down and turn it out onto a floured surface. Knead the dough for 1 minute, then divide it in half. Shape each half into a ball and place them in the pots. Cover the pots with plastic wrap and put them aside in a warm, draft-free spot until the loaves have almost doubled in bulk, about 40 minutes to 1 hour.
Move one of your oven racks to the lowest position and move the second rack up high or take it out of the oven. Preheat the oven to 400°F/200°C.
As soon as the loaves appear to have doubled, brush the top of each one with a little melted butter. Use a sharp serrated knife to make a shallow slash right across the middle of each loaf.
Bake the loaves for 30 minutes, then reduce the heat to 375°F/190°C and bake for an additional 15 to 20 minutes, until the tops of the loaves are a rich golden brown. Transfer the pots to a cooling rack. Cool for about 5 minutes, then slide the loaves out of the pots and let cool on their sides. When completely cool, store in plastic bags in the refrigerator.
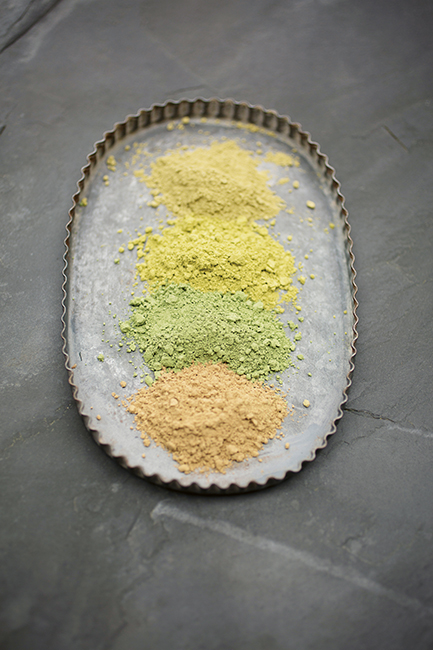
Natural hair dye. Photography by Melinda Dimauro.
Do It Yourself: Dye Your Hair with Herbs
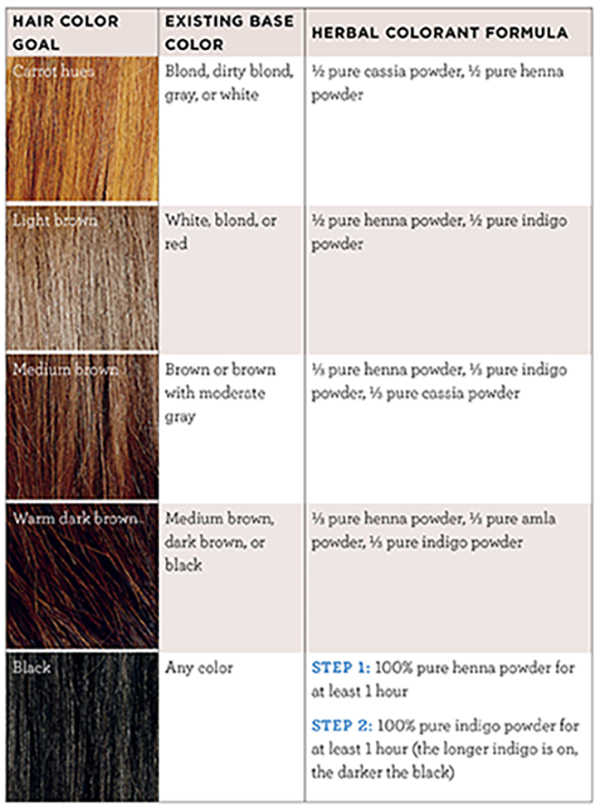
When you use herbal hair colorants, you don’t need to put up with burning eyes and scalp until it is time to wash out the color. You don’t need to use a timer that dings to alert you when it’s time to rush to a sink. In fact, the longer herbal hair colorants are on, the deeper the tone and the more lasting the stain. If coloring your entire head, use about 13/4 ounces of herbal powder for chin-length hair and 31/2 to 7 ounces for long hair, depending on length and thickness.
Herbal Colorant Recipes
The color ratios at right are for virgin hair — hair that does not have a line demarcating chemically colored hair from natural, new growth. If you do have chemically colored hair with a line of demarcation, you can still use these ratios, but you will then need to use some ingenuity and instinct to create a second recipe to blend that line of demarcation. The one rule with herbal hair colorants: you can’t make dark hair lighter.